
Beginners Guide to Night Photography
Like most people, I would look up from time to time and think to myself "ooo pretty stars" but never gave much thought about photographing them. A friend of mine, who is an astro-nerd, really started to open my eyes to how amazing the cosmos really is and began to invite me to join him on trips with his telescope. I still remember seeing Saturn for the first time, I was absolutely amazed. Ever since then, I plan at least one trip to go out with the camera and get my fill of astrophotography.During my last outing, the observing field was absolutely packed. Telescopes and campers as far as the eye can see; it was nuts. It seems odd to say but in a field full of $10,000 telescope setups I got a lot of attention for just having a DSLR. As the night wore on my friend noticed some young ladies were taking photos with a DSLR and were struggling. He invited them over to talk with me about how to take photos of the stars. I had forgotten how confusing astrophotography can be for beginners so today I want to share what I have learned over the years.

Essential Equipment Needed for Night Photography
Tripod - Since we are dealing with long exposures of 20 to 30 seconds, a sturdy tripod is a must!
Camera with MANUAL mode - I recommend a Full Frame DSLR or mirrorless camera. I'll explain more later but a full frame will allow you to hold the shutter open longer. However a crop sensor camera will work also.
A Wide Aperture Lens - Shooting in the dark you need to be able to gather a lot of light in a short amount of time. I recommend f/2.8 or faster lens. Personally I think the Rokinon 14 mm f/2.8 is the best lens on the market for astrophotography, and it's under $400!
Cable Release - This will reduce camera shake from pressing the shutter button. Also, if you plan to shoot longer than 30 seconds you will need a cable release to lock the shutter open.
Red Flashlight - Bright lights will impair your natural night vision. Ever look at your cell phone early in the morning; feels like your eyes are burning. Using a red light will help, plus it's polite when shooting with other people.
Luxury Items
Lens Warmer - A lens warmer will keep your lens from fogging up as the temperature drops. Plus will help keep the dew off.
Star Tracking Mount - With a star tracking mount you can leave the shutter open for minutes even hours. More on this below.
Picking the RIGHT Location
Cherry Springs State Park is by far one of the best state parks in Pennsylvania for viewing the night sky. In fact, according to darksitefinder.com, Cherry Springs has the darkest skies in Pennsylvania. Which is why astronomy nerds and photographers alike flock to this area to view the heavens in all its unpolluted glory.
Camera Settings
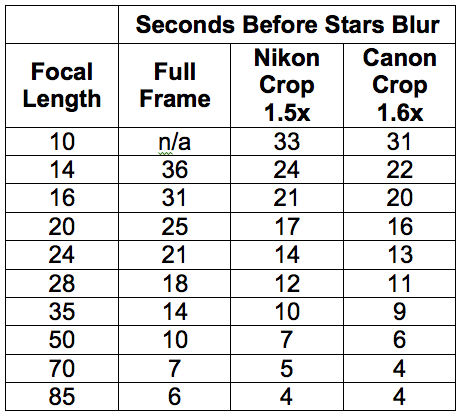
With the right gear, and a little know how, photographing the stars is actually pretty straight forward. Due to the rotation of the Earth we experience the sense that the stars are moving across the sky. Because of this, if the shutter is left open to long, the stars will come out blurry otherwise known as "star trails". Star trails can be used creatively but to obtain tack sharp stars photographers use what's called the "500 rule". Sorry to say...there is math involved.Here's the super complex formula!
500 / Your Focal Length = Longest Exposure Possible (In Seconds)
Few, that is a scary formula. lol.

For example: I shot the above photo with a 24mm Lens on a Full Frame camera. So... 500 / 24 = 21 seconds of usable exposure time.When figuring out your exposure with a crop sensor the math gets a little more tricky. Because the sensor is smaller we need to figure in the "crop factor". Typically Nikon's crop factor is x1.5 and canon is x1.6.So the formula for a
canon
crop sensor would be...
500 / (Focal Length x 1.6) = Longest Exposure Possible (In Seconds)
For Example: 500 / (24mm x 1.6) = 13 seconds of usable exposure time.Yay Math! Right?!? Ok I know, this is a pain to figure out in the dark while tired and cold. So feel free to print out the chart below for easy cheating.
Using a Star Tracking Mount

If you're serious about taking photos of the night sky then a star tracking mount is a wonderful piece of equipment to own. With a star tracking mount the shutter can be left open for minutes, even hours without star trails. Best of all...the math we just talked about above goes right out the window.
What is a Star Tracking Mount
Tracking mounts are motorized heads that attach to your tripod. The tracking mount head will rotate at the same speed the Earth rotates on it's axis and in doing so will counteract the apparent movement of the stars. These types of mounts come in many shapes and sizes but the principal is the same.
How to set up a star tracking mount
The mount I use, and recommend, is the "Sky-Watcher Star Adventurer Tracking Mount". The nice thing about the Sky-Watcher mount there is plenty of room to grow because it doubles as a telescope mount. Also there are multiple tracking options, including moon tracking, sun tracking and rotation options for time lapse photography. Set up of these mounts can be intimidating at first but with practice it's a piece of cake.
Step 1 -
First thing is to point your mount to the North and locate the star called "Polaris". There are a couple ways to find Polaris. If you watch the northern sky, right after sunset during blue hour, normally the first star you see is Polaris. If you are unsure which star (of the billions that are up there)is Polaris then the best app to use is "SkyView Lite". This app is very helpful with identifying objects in the sky. Also, if your mount has multiple tacking options make sure the star option is selected.
Step 2 -
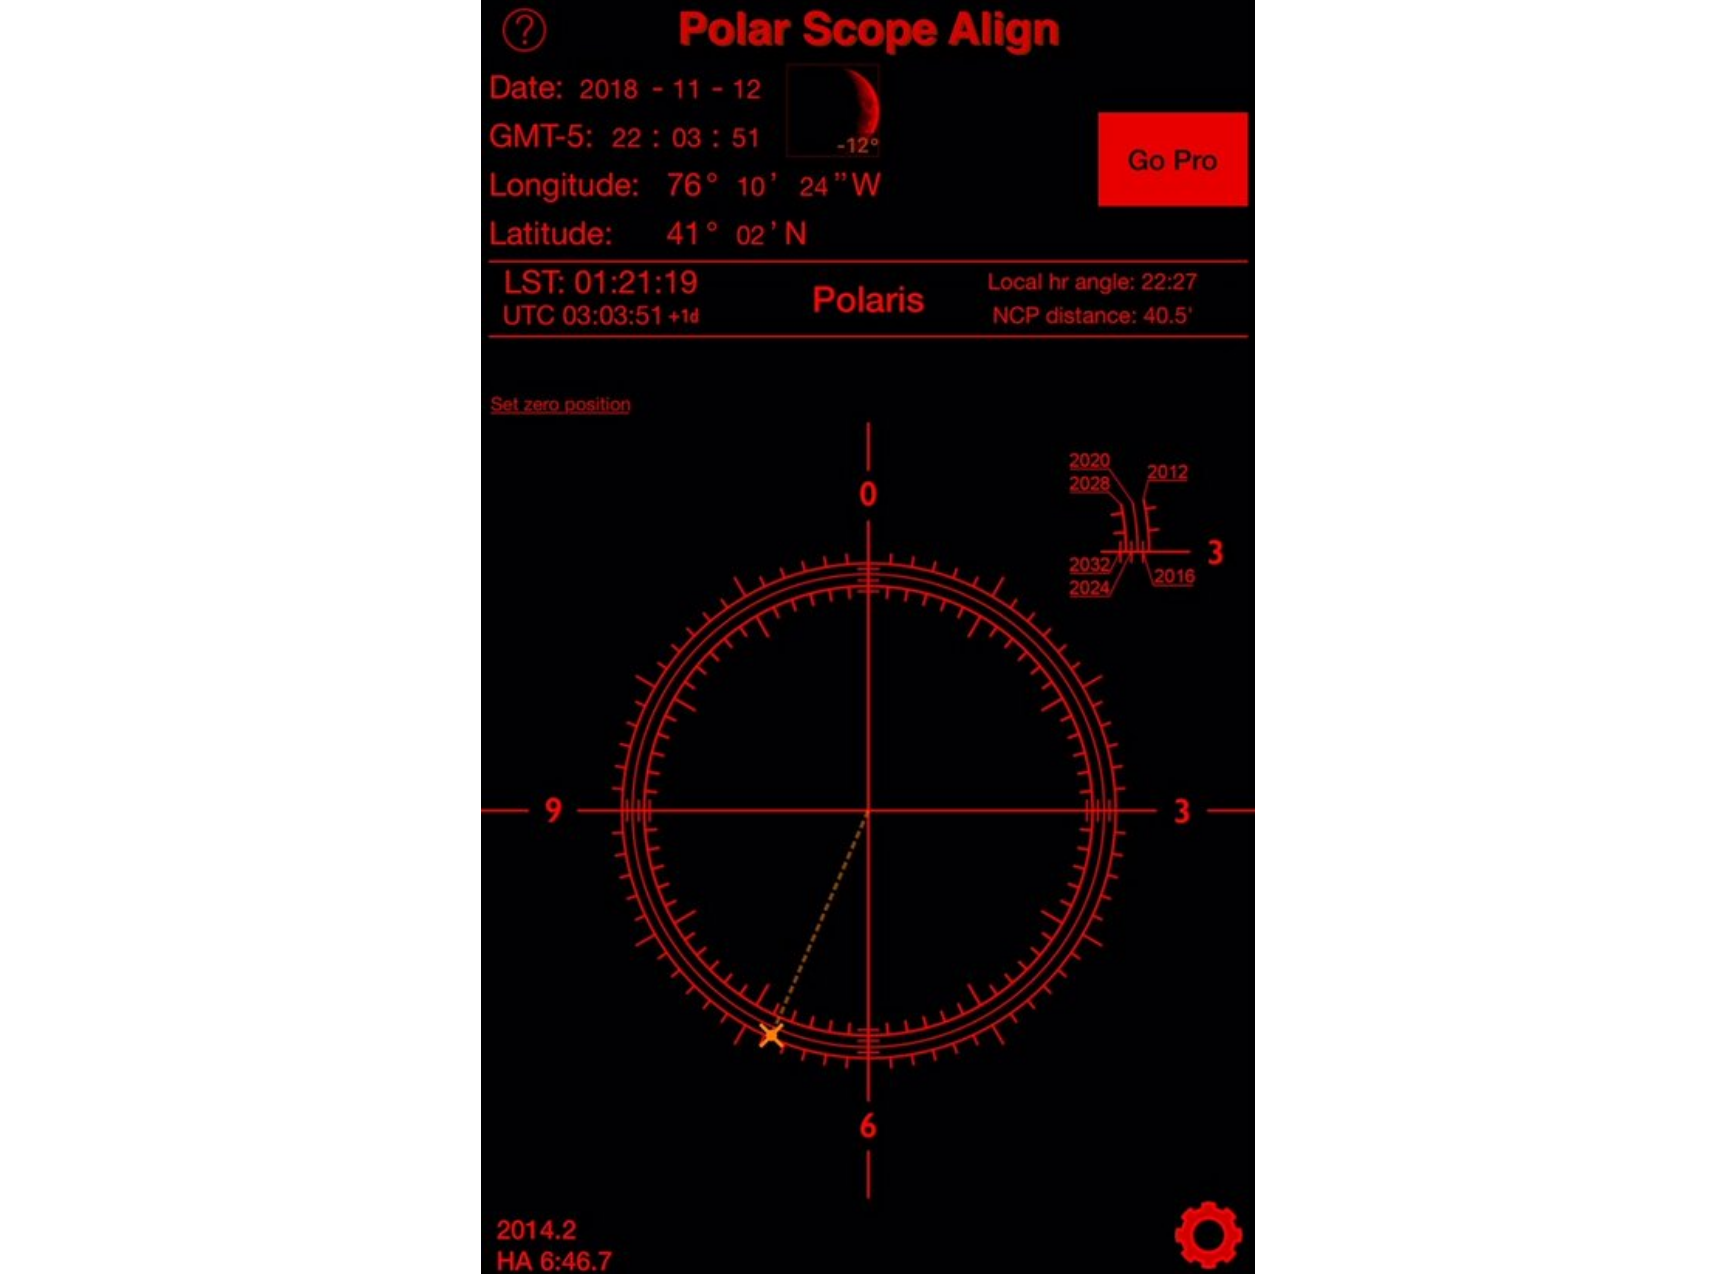
Second thing we need to determine what your actual Latitude is on the Earth. There are a few ways to figure this out but the easiest is to download the "Polar Scope Align" app. Set your Latitude on the mount. Note: Adjustments maybe necessary during step 3.
Step 3 -
If you selected the correct mount configuration on the Polar Scope app then the cross hare display should match what you see through the alignment scope on your mount. Use the app to determine where to place Polaris on the circle. On the app the orange X represents where Polaris should be oriented in the alignment scope. Using the adjusters on the mount orient Polaris exactly as shown on the app.
Step 4 -
Attach a good ball head to the mount so you can point your camera in all directions.
Step 5 -
DO NOT move the tripod or rotate the mount. The mount must remain pointing north or you will lose the tracking ability of the mount. I've done it once or twice and felt pretty dumb once I realized what I did.
Picking the right Night Sky Subject

Just like any other form of landscape photography picking the right subject can make or break your photo. Try picking an interesting tree and creating a silhouette with the night sky. Even blending a photo during blue hour and the night sky would be interesting.
Shoot the Moon
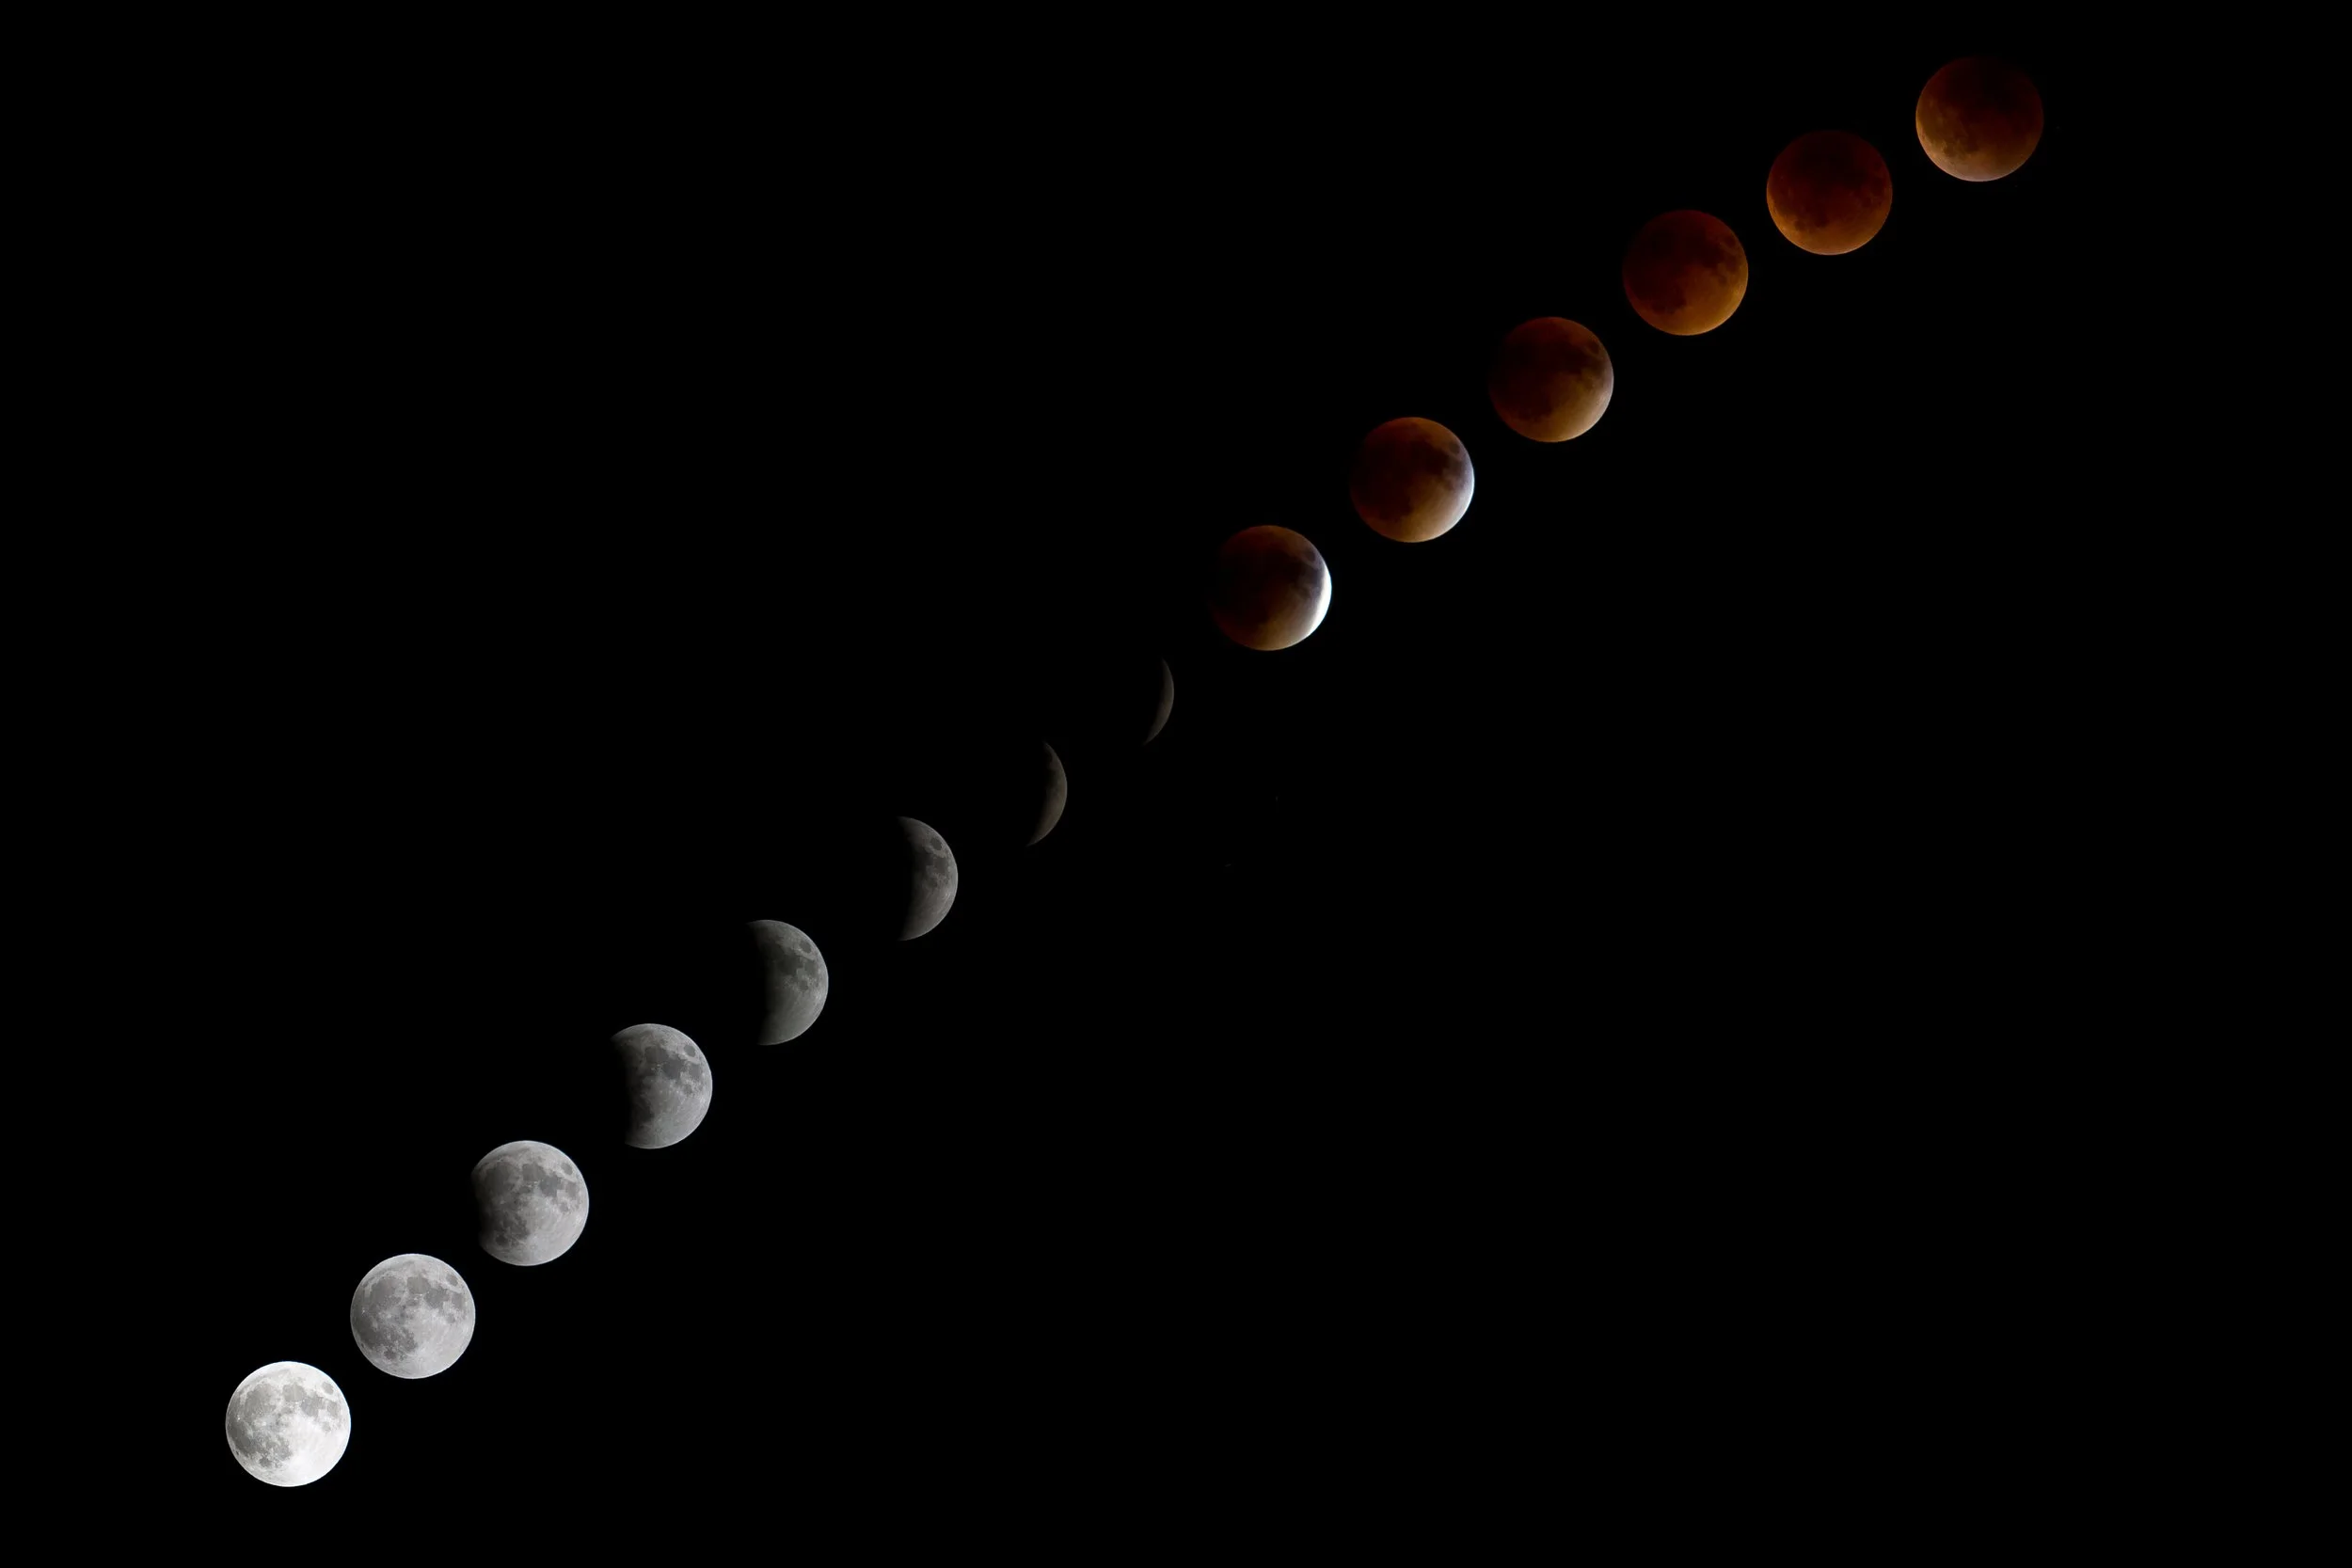
Photographing the moon can add interest to your photo. I really enjoyed creating the below photo of the last total lunar eclipse. Just keep in mind that the exposure for the moon and the stars will be completely different, so you may need to do some blending in photoshop if you plan to include both.
Conclusion
Night photography is certainly one of my favorite types of photography. The world is so quite and peaceful during the night and can be a great way to unwind. I hope this blog post helps inspire you to get your gear out and start shooting the stars. All that's left is to grab yourself an intervalometer and start shooting. Happy Shooting!