
15 Lightroom Tips for Beginners
Lightroom is an incredibly powerful organizational and photo editing software for all types of photographers. Importing photos into Lightroom is always the first step in my workflow. Here are my top 15 favorite Lightroom tools to up your Lightroom game.
1. Create Collections
One of the most helpful tools found in Lightroom is the ability to create collections. Creating collections is the best way to keep all your files organized and accessible while working inside of Lightroom.
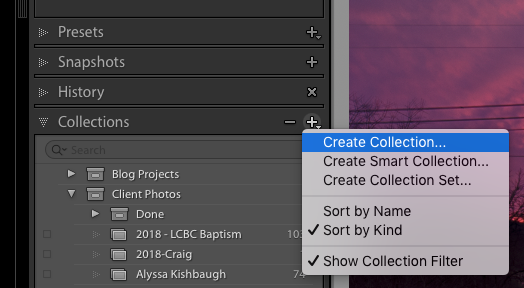
On the left panel in the Library module click on the plus sign to bring up the options.
There are 3 different types of collections.
Collection Set
Think of the collection set as filing cabinet where each "drawer" will contain different types of projects. For example I have separate collection sets named "Clients", "Family" and "Landscapes" to quickly find a certain type of photo project.
Collection
Inside of each collection set there will be a collection. This will be where you can store the individual photo projects currently being worked on. For example, inside of the "Clients" collection set I can add a new collection called "Ridall and Yoder wedding".
Smart Collections
Smart collections are very useful for filtering photos from multiple collections into one collection. For example, I like to use smart collections to filter out my portfolio worthy photos all into one smart collection. I like to set a "green" color label to all of my best landscape photos. By creating a smart collection, Lightroom can pull every photo in the library with a green color label into one smart collection for easy access. Best part is every time you add a new green color label the smart collection updates automatically.
2. Crop Tool Overlays
Crop tool overlays are helpful when refining a photos composition during cropping. Lightroom defaults the rule of thirds overlay, however by hitting "O" key on the keyboard you can toggle between various types of overlays.

Tip: If you selected the crop tool but do not see any overlays make sure the tool overlay option, at the bottom left corner, is set to Always.
3. Set Black and White Points
Setting your black and white points at the start of your editing can be a great place to start. While dragging the black or white sliders back and forth, hold down the "option" key on a Mac, to activate a visual mask. While holding the option key and dragging the white slider the photo will turn black. As the whites in the photo are increased, over exposed pixels will start to appear. These pixels represent areas of the photograph starting to lose detail, otherwise known as clipping. Visa versa for the black slider.
4. Checking Highlight / Dark Clipping
A useful short cut for finding clipped areas of a photograph is hitting the "J" key. Blue areas represent loss of detail in the darks and Red areas represent loss of detail in the highlights.
5. White Balance Eye Dropper Tool
The white balance eye dropper tool is a great place to start when setting a correct white balance. Simply click on the eye dropper icon, found in the basic panel of the develop module, and select a neutral area on your photo such as white or grey. From here you can fine tune the white balance using the sliders for a more exact white balance or a creative one.
6. Graduated Filter Brush
The graduated filter tool in Lightroom alone is an awesome tool for correcting the exposure of, lets say, a bright sky. However, sometimes when using the graduated filter you may end up altering the exposure of an object that you don't want to change. By using the brush feature you now have the option to erase areas you don't want the filter to effect.

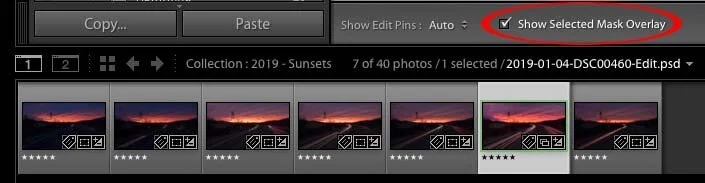
7. Show Selected Mask Overlay
While using the graduated filter, radial filter or brush sometimes it is difficult to see what areas of the photo are being changed. On the toolbar at the bottom left of Lightroom, click the check box called "show selected mask overlay". Now there should be a transparent red mask showing all the areas of the photo being effected.
8. Brush Auto Mask
The brush auto mask tool is extremely helpful in cases where you need a more precise selection. While in the brush tool panel, check the box called "auto mask". Personally, I like to use the brush around the edges of my subject with the mask on. Then I will turn off the auto mask and paint in the rest. The auto mask will do a good job helping you to mask out the edges . However, a word of caution, because the auto mask is looking for contrast and brightness differences to figure out the selection sometimes the tool will not pick up areas on your subject. Be sure to check the selection before making to many changes.
9. Brush Range Mask
Like the brush auto mask the range mask is also extremely helpful. The Range Mask is used to affect a specific area based on Luminance or Color and can be used with the graduated filter, radial filter or brush tool. After painting the area you want to fix, select the type of mask you want to use and use the eyedropper tool to select the luminance or color of your choice.

Tip: Check the box for "Show Selected Mask Overlay", from number 7, to have a visual of the mask.
10. Before Preview
Sometimes it is nice to see how far you have come in an edit or to make sure the edit doesn't look to extreme. Hit the \ button on the keyboard to toggle back and forth from before and current.
11. Sync Settings
Syncing develop setting across multiple photos is a huge time saver, especially for studio work. Let's say you took a bunch of photos in the studio, or a place where the exposure doesn't change much, you can fine tune one photo then sync all the settings across all similar photos. While in the develop module, first select your edited photo from the thumbnail tool bar, then hold down the shift or command button on your keyboard and select all unedited photos you want to sync. Click the Sync button on the bottom right of Lightroom to bring up the Synchronize Setting dialog box. From here your can select what edits you wish to copy across all the photos.
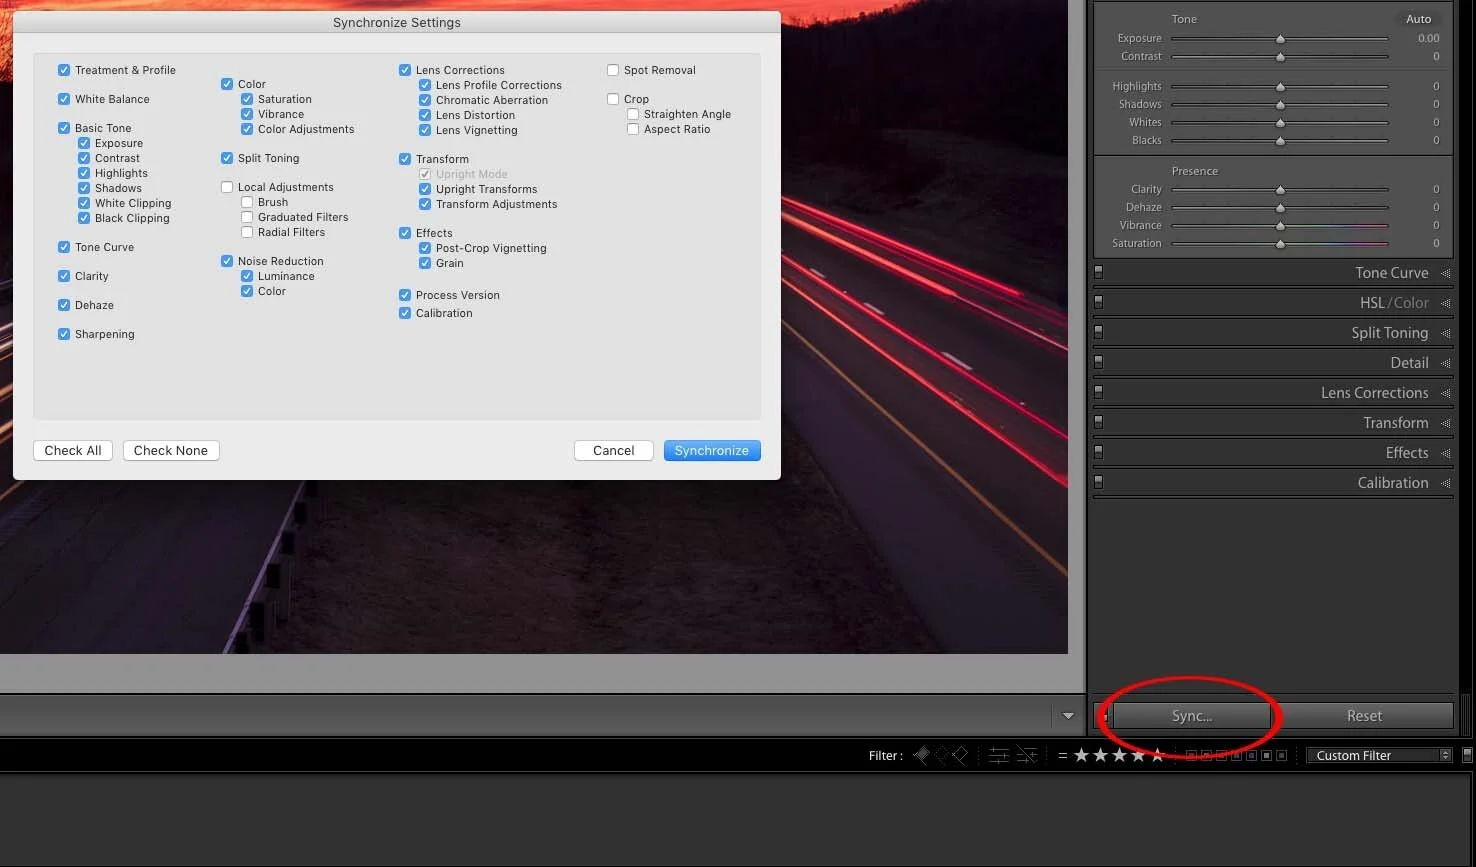
Tip: Settings such as Local Adjustments, Spot Removal and Crop are best to leave unchecked while syncing settings. Unless the subject does not move in any of the frames, such as product photography, then these adjustments will not sync properly. Best to do these adjustments with each photo.
12. Match Total Exposure
Have a series of photos that the exposure just doesn't match for some reason. Not a problem! Just use the Match Total Exposure tool. While in the develop module, first select the photos you want to match the exposures from the thumbnail tool bar. The go to settings, Match Total Exposures. Lightroom will do it's magic to figure out an average exposure for all the photos, then Lightroom will make the adjustment to the Exposure slider in the Basic panel.

13. Create a Virtual Copy
Often, I find myself really liking a photo but become tore between color and black and white. Lightroom allows you to create a virtual copy of an edit for multiple editing choices. Right click on the photo and select "Create Virtual Copy" and another copy of the photo will appear in the thumbnail tool bar at the bottom. Now you have two photos independent of one another.
14. Soft Proofing
Soft proofing is a true hidden gem for those of us who print their own photographs. The soft proofing tool in Lightroom will simulate paper and ink settings based on your printers ICC Profiles. To activate soft proofing hit the "S" key on the keyboard. From the drop box found under the histogram select the ICC Profile of the paper you plan to print on, check your printer manufacture website for ICC downloads, and make sure the Simulate Paper & Ink box is checked. Now Lightroom will give you a preview of what your photo will look like printed. You will be shocked to see that you may need more contrast.
ICC Profiles are color profiles created by your printer manufacture to maintain color accuracy when printing. Different inks and papers react differently when printing. It's important to use the soft proofing tool before printing. Even if your monitor is calibrated the print will look different than what your screen shows for various reasons.

Tip: Hold down the shift button and hit the "S" key to toggle the Gamut warnings on and off. All the areas that show up in red are outside the printers color gamut. In other words your printer is unable to create that color. Reds and Oranges are almost always an issue. Simply get out of the Soft Proofing tool and adjust the out of gamut colors using the HSL panel in the develop module. You might have to toggle into the soft proofing tool a couple times to get the color set right, but it's worth it in the long run.
15. Lights out Mode
Now that you have spent hours if not days on an edit, it is time to sit back an admire your hard work. Hit the "L" key on the keyboard to turn the lights off and get lost in your creation. Hit the L key a couple times when your done to toggle back to the normal mode.
Conclusion
Hopefully these tips help make your Lightroom experience more enjoyable. Comment below with your favorite Lightroom tool!